Chào Guest | Nhóm "Guests" | RSS
Image Image Image Image Image Image Image Image
KHO PHIM CHẤT LƯỢNG CAO - MOVIES STORE
LINK MEDIAFIRE, JUMBOFILES, RAPIDSHARE, UPLOADED

[ CHỦ ĐỀ MỚI · THÀNH VIÊN · NỘI QUY · TÌM KIẾM · RSS ]
  • Page 1 of 1
  • 1
Forum moderator: handcock  
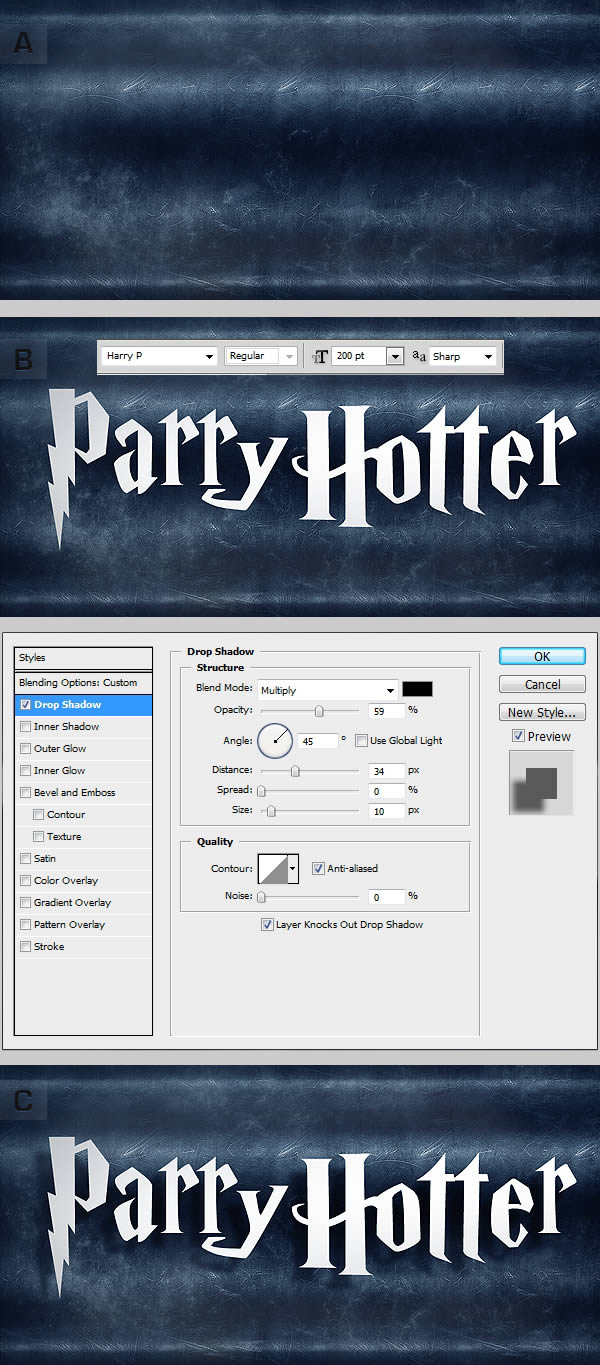
Forum » Main Forum » PhotoShop Tuts » Create a “Parry Hotter” Text Effect in Photoshop (psdtuts+)
Create a “Parry Hotter” Text Effect in Photoshop
handcockDate: Thứ 3, 2013-03-12, 11:49 PM | Message # 1
Đến gần khí quyển
Group: Administrators
Messages: 1074
Reputation: 10
Status: Offline
Final Product What You'll Be Creating

DownloadSOURCE FILES

In this quick tip tutorial we will demonstrate how to create a cinematic “Parry Hotter” Text Effect using the layer styles. Let’s get started!


Tutorial AssetsThe following assets were used during the production of this tutorial.


Step 1Make a new .PSD document, size 1000 x 500 pixels, RGB color, 72 dpi. Create a new layer and fill it with a grunge metal texture and colorize this with the color that you desire. Now create the text using this font: Parry Hotter. Use the settings shown in the following pictures. Now rename this text: “Base”. Then go in the menu Layer > Layer Styles > Blending Options and use these settings:


Step 2Duplicate the text and rename it “False 3D”. Right click on his layer and click to “Clear Layer Style” or in the Styles Palette click on the first style “Default style (None)” (It’s the same thing). Move this layer slightly to left in order to create a false 3D effect. Then go in the menu Layer > Layer Style > Blending Options and use these settings:


Step 3Duplicate the text “base” and rename it “Bevel”. Right click on his layer and click to “Clear Layer Style” or in the Styles Palette click on the first style “Default style (None)” (It’s the same thing). Now put this layer above the other layers. In the Blending Options menu on the right set the fill to 0%. Then go in the menu Layer > Layer Style > Blending Options and use these settings:


Step 5Your text effect is almost completed. Now you have to create "Gradient Map" layer in order to colorize the entire work of the color that you desire. For example, I’ve chosen the color blue. Finally to make it nicer, I’ve added some sparkles with simple brushes.


Conclusion


Earthandsky-Exciting Personal Website-Join Us and feel!
 
Forum » Main Forum » PhotoShop Tuts » Create a “Parry Hotter” Text Effect in Photoshop (psdtuts+)
  • Page 1 of 1
  • 1
Search:

  GOOD LUCK!   Main   Registration   Login  
Namecheap.com - Cheap domain name registration, renewal and transfers - Free SSL Certificates - Web Hosting
menu

tip

Chia sẻ


Clicksia
SEO sprint - Всё для максимальной раскрутки!
Copyright 2024 © DTD88 Make a free website with uCoz